Building a Unit Test Automation
Pega provides the TestRunner application packaged with the Studio installation. The TestRunner application executes the test automations in a deployment package. Not all automations in a project are test automations. To create a test automation, you must use an Entry point and set the UnitTest property of the Entry point to True. In addition, automations for unit testing also require at least one execution path that terminates with the TestSucceeded component and one path that terminates with the TestFailed component. These components are located in the Unit Test tab of the Toolbox.
Note: You can run TestRunner from Studio (by selecting the Tools > Run Unit Tests option) or by running the TestRunner application from the command line (OpenSpan.TestRunner.exe).
This topic describes how to create an example project which contains automations which test whether controls within the target application are matched. This kind of project is useful to make sure match rules do not fail after a target application is updated.
Example project overview
The example project described in this topic shows how to use the Unit Test feature to check the matching status of targets in the sample application CRM (installed as an option in the Extras folder within the Studio installation directory). This example performs the following steps.
Launches the CRM.exe application.
Automatically logs into the CRM application (AutoLogin automation)
Runs a test automation to verify the matching status of the MDIClient window using the WaitForCreate() method. If the window is matched, the automation executes the PerformClick method on the New Call button to open a New Call window. (CRMMDI_Test automation)
Runs a test automation to verify the matching status of the New Call window using the WaitForCreate() method. (NewCall_Test automation)
Runs an automation to verify the matching status of the main targets on the New Call window using the IsCreated property. (ChildControls_Test automation)
Prepare the base project
Follow these steps to prepare the base project.
Create a new solution and add these project items to the solution:
Windows Application - Name adapter: CRMSampleTest
Automation - Named AutoLogin
Automation - Named ChildControls_Test
Automation - Named CRMMDI_Test
Automation - Named NewCall_Test
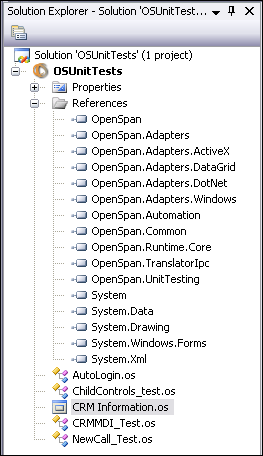
Save your solution. Your Solution Explorer should look like the following:
Open the CRMSampleTest Windows adapter project item.
Set the path to the executable for the Studio sample CRM application, such as C:\Program Files\CRM App\CRM.exe.
Start the Interrogator and interrogate the Login Window - Login Button.
Login to the CRM application and interrogate the New Call and User toolbar buttons.
Click the New Call button and interrogate these targets:
Account number label
Name text box
Street Address text box
City text box
State text box
ZIP text box
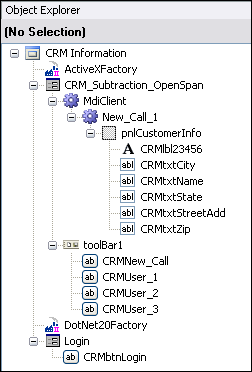
Save the solution. Object Explorer for the CRM adapter should look like the following:
Create the AutoLogin automation
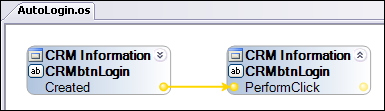
The AutoLogin automation will complete the CRM Login window by waiting for the Login button to be created and then triggering the PerformClick method on the Login button (the UserName and Password text boxes can be blank).
Complete the automation as follow:
Save the solution.
Create the first test automation - CRMMDI-Test
The CRMMDI_Test automation tests the matching (created) status of the MDIClient control. This control is the target Multiple Document Interface which contains the New Call windows. To create this automation, do the following:
Open the CRMMDI_Text automation in the Designer.
Right-click in the upper left corner of the automation and select Add Entry Point. An Entry point name Execute displays on the automation.
Select the Execute design block and set the UnitTest property to TRUE.
Add the MDIClient.WaitForCreate() and CRMNew_CallButton.PerformClick() methods to the automation.
From the Unit Test tab in the Toolbox, add the TestFailed and TestSuccessful components.
Set the message parameter for the TestFailed and TestSuccessful components as follows.
TestFailed message: MDIParent Not Created (not matched w/in timeout)
TestSuccessful message: MDIParent Created (matched)
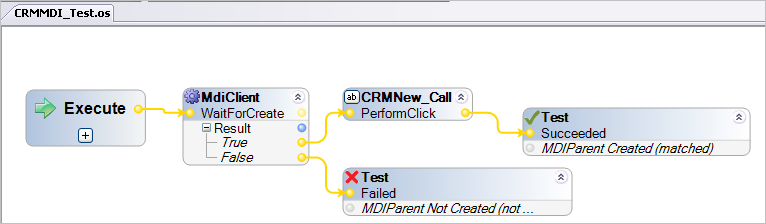
Arrange and connect the design blocks as follows, then save the solution:
Test the CRMMDI-Test automation
To run the CRMMDI_Test automation through TestRunner and view the unit test results, do the following:
From the main menu, select the Tools > Run Unit Tests option. Studio builds the project and launches the project in Runtime. The Unit Tests window is displayed.
Close the Unit Tests window. The system closes the Runtime application and returns to the Designer.
Add the NewCall and ChildControls automations
Complete the NewCall_Test automation as shown below. Set the UnitTest property for the Execute block to True.

Complete the ChildControlsl_Test automation as shown below. Set the UnitTest property for the Execute block to True.

Save the solution.
Test the project automations
To run the CRMMDI_Test, NewCall_Test, and ChildControls_Test automations through TestRunner and view the unit test results, do the following:
From the main menu, select the Tools > Run Unit Tests option. Studio builds the project and launches the project in Runtime. The Unit Tests window displays.
Close the Unit Tests window. The system closes the Runtime application and returns to the Designer.
