Using the enhanced Interrogation Form
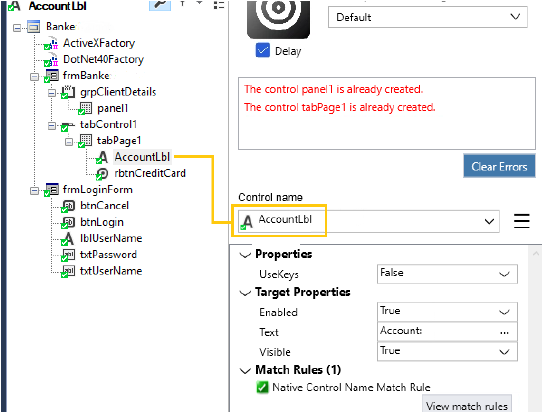
In version 19.1.34 and later, the most commonly used functions in interrogation are available directly on the Interrogation Form. Robot Studio minimizes when you start interrogation; you work only within the Interrogation Form and your application. You can rename controls, highlight controls, delete controls, modify properties, and test modifying target properties and methods directly from the Interrogation Form. The Interrogation Form also contains a complete list of interrogated objects and their current matching status, which is similar to the Object Explorer in Robot Studio.
You only need to return to Robot Studio to use the more advanced features, such as editing match rules or working with the Windows, Web, or Virtual controls tab.
The enhanced Interrogation Form also lets you start a timer and then navigate to a control in the application. When the timer expires, Robot Studio interrogates the currently selected control. This greatly enhances your ability to interrogate controls that hide automatically when they lose focus.
The following functions are available on the enhanced Interrogation Form:
- View the list of interrogated objects on the adapter
- Use delayed interrogation
- Switch the currently selected control
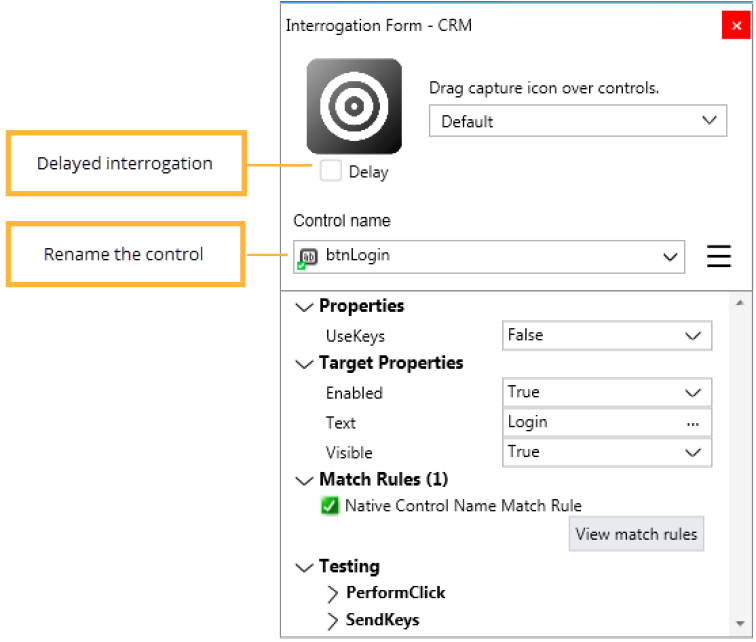
- Rename the current control
- Delete the current control
- Highlight the current control
- Refresh the matching on the current control
- View and modify standard properties on the current control
- View and modify a select list of Target properties on the current control
- View match rules for the current control and the matching status of those rules
- Test a select list of methods of the current control
- Add context menu items to the current control, if available
- Add menu items to the current control, if available
- Add Control Regions to the current control, if available
Note: These functions are also available from Robot Studio.
Working with a control during interrogation
After you interrogate a control, the new control becomes the current control and is selected in the Control name box on the Interrogation Form. The cursor moves to the Control name box field, so that you can rename the control before interrogating the next control. You can also modify any of the standard properties associated with the control.
To test how automation works with the control, you can modify target properties. When modified, these properties directly affect the behavior of the application, so use caution. A common test is to set the Text property to see how other controls react. You can also use the Testing section to execute a select list of methods on the control. All of these tests enhance your understanding of how the application behaves when automated.
Note: The controls that you select on the Interrogation Form can also be found on the Object Explorer in Robot Studio.
Interrogating and renaming controls after interrogation
- To interrogate a control, drag the bullseye icon in the Interrogation Form to the target control in the application. The control is created and becomes the current control in the Interrogation Form. The cursor moves to the Control name field.
- In the Control name field, enter a new, more descriptive name as required.
- To save your changes, press Enter or move the cursor out of the Control name field to save the change.
Modifying standard properties
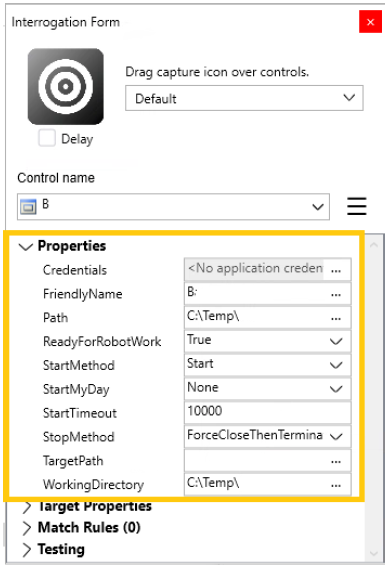
From the Interrogation Form, you can modify property values that are also available on the standard property grid for the current control. Only standard properties appear here. To see the full list of properties, switch to Robot Studio.
Modifying target properties
Target properties are the properties of the interrogated control within the application. Some commonly used target properties are: Text, InnerHtml, OuterHtml, Enabled, and Visible. Altering the values of these properties changes the value of the control within the application, so you can perform automation testing while you are interrogating. Note that editing target properties to invalid values could have a negative impact on the application. When used with the methods in the Testing section, you can simulate most steps that you would perform in automation.
Reviewing Match Rules
The match rules section shows you the match rules that the system assigns to the current control and whether they are currently matched. You cannot directly edit the match rules in the Interrogation Form. Clicking on View match rules maximizes Robot Studio and allows you to edit the match rules. When you finish editing the rules, minimize Robot Studio and you are returned to the Interrogation Form.
For more about editing match rules, see Modifying Match Rule Properties.
Testing methods on a control
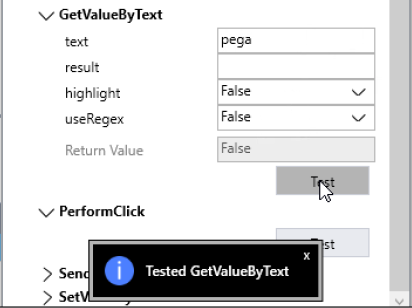
You can use a selected list of methods on the Interrogation Form to test the current control. The list of methods available is based on the type of the currently selected control. Expand the method you would like to test, fill in the required parameters, and then click Test.
By testing methods and modifying target properties, you can simulate automation during interrogation. You can switch between controls by changing the current control on the Interrogation Form. Use this to test logging into an application, performing application navigation, and other use cases.
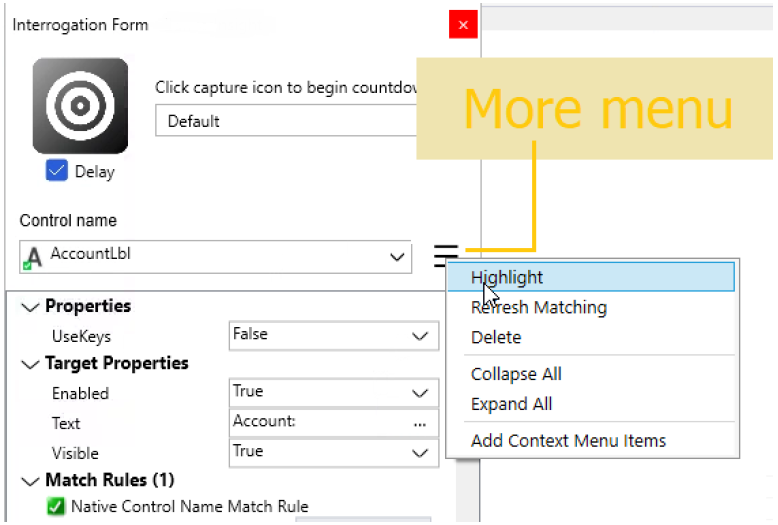
Using the More menu options
Additional functionality is available under the More menu, next to the Control Name field.
Highlighting a control
Perform the following steps to highlight a control so you can identify it. To use the Highlight feature, the control must be currently matched.
- From the Control name drop-down list, select a currently matched control.
- Click the More menu and then click Highlight.
A box briefly flashes around the selected control.
Refreshing matching
If you change match rules or other properties, or a control is not currently matching, you can refresh the matching to make Robot Studio rematch the control.
- From the Control name drop-down list, select a control.
- Click the More menu and then click Refresh Matching.
The matching status of the control is updated (if it changes).
Deleting a control
To delete a control, select it as the current control. If the control is used in an automation, you receive a warning that automations can get broken, giving you an opportunity to cancel the deletion.
- From the Control name drop-down list, select a control.
- Click the More menu, and then click Delete.
-
If the control or any of its children are not used in any automation, you are prompted with a simple confirmation message. Answer Yes to delete the control.
-
If an automation does use the control or any of its children, you receive the following message. Clicking Yes can break the listed automations.
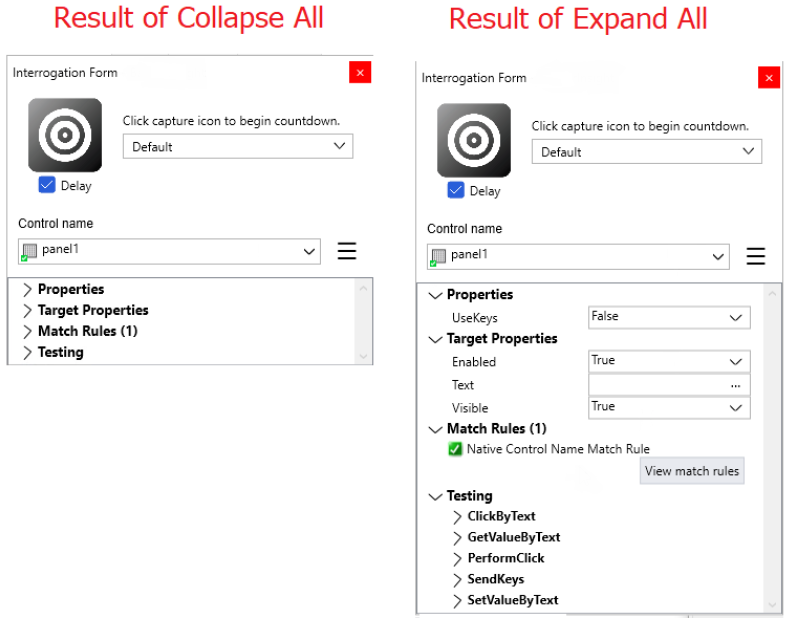
Collapse All/Expand All
Use the Collapse All or Expand All options to open or close the four main groups on the Interrogation Form:
- Properties
- Target Properties
- Match Rules
- Testing
- On the Interrogation Form, click the More icon.
- In the More menu, click either Expand All or Collapse All.
Adding Context Menu/Menu items
Container controls often have menus or context menus associated with them. When a control has a menu, the Add Menu Items or the Add Context Menu Items option is available. To add menu items to the list of interrogated objects, perform the following steps:
- From the Control name drop-down list, select a container control.
- From the More menu, select either Add Menu Items or Add Context Menu Items.
- In the Add Menu Items or Add Context Menu Items window, select the options that you want to add to the list of interrogated controls.
Delayed Interrogation feature
Some controls disappear when they lose focus, making it difficult to interrogate the control. This often happens with menus in applications. The delayed interrogation feature lets you set a countdown timer that starts when you click the bullseye. This gives time to navigate the application to the desired control - you will see controls highlighted beneath the mouse as in normal interrogation mode. When the timer elapses the control that is selected will be interrogated.
Enabling the delayed interrogation feature
- Select the Delay check box.
- In the popup window, change the time-delay setting to the number of seconds the countdown timer should use, and then click OK.
Performing delayed interrogation
- Click the bullseye. The timer starts counting down.
- Navigate the application to the control that you want to interrogate and make sure it is highlighted.
When the timer expires, Robot Studio interrogates the highlighted control.
