Using the xmlDocumentComponent
These steps show how to load an XML document and retrieve information from an example document using the xmlDocumentComponent and xmlElementComponent schema properties. The steps are organized into the following tasks.
The sample document is free-form and contains the following XML.
<?xml version="1.0" encoding="UTF-8"?>
<bookstore>
<book>
<title lang="eng">Harry Potter And The Deathly Hallows</title>
<pub_name>Arthur A. Levine Books</pub_name>
<ISBN>0545139708</ISBN>
<pages>784</pages>
<price>10.19</price>
</book>
<book>
<title lang="eng">The Sword in the Stone</title>
<pub_name>Laurel Leaf </pub_name>
<ISBN>0440984459</ISBN>
<pages>256</pages>
<price>16.49</price>
</book>
<book>
<title lang="eng">The Story of King Arthur and His Knights</title>
<pub_name>Sterling</pub_name>
<ISBN>1402725035</ISBN>
<pages>320</pages>
<price>9.95</price>
</book>
<book>
<title lang="eng">The Extraordinary Adventures of Alfred Kropp</title>
<pub_name>Bloomsbury USA Children's Books</pub_name>
<ISBN>1599900440</ISBN>
<pages>352</pages>
<price>8.99</price>
</book>
<book>
<title lang="eng">Black Horses for the King</title>
<pub_name>Del Rey</pub_name>
<ISBN>0345408810</ISBN>
<pages>217</pages>
<price>6.95</price>
</book>
</bookstore>
Loading the OuterXML of an XML document
Follow these steps:
Create a solution and assign this name to it: XMLDocument 1.
Add a Windows form to the solution. This form is used to specify the name of the XML document to load and display information from the document. Complete the Windows form as shown here, then save the solution.

Add an automation to the solution and assign this name to it: LoadDocument.
The first part of the automation loads an XML document and displays the OuterXML in the txtXml text box. Begin by adding the xmlDocumentComponent xmlDocumentComponent from the Advanced tab on the toolbox to the Global tab in the component tray for the automation. By adding the component to the Global tray, other automations will have access to the document.

By leaving the xmlDocumentComponent Schema property blank in the property window, the component defaults to FreeForm. For more information on the properties or methods used in these steps, see the xmlDocumentComponent topic. Add the xmlDocumentComponent Load (1 parameter string filename) to the automation. Complete this part of the automation as follows:

Save and run the solution. Enter the full path and file name of the XML document to load and click the Load button. The resulting Windows form should look similar to this example.

The next part of the solution adds xmlDocumentComponent methods to retrieve the following information for a selected node or nodes in the document.
Whether child nodes exist for the selection (HasChildNodes property)
InnerText
InnerXml
LocalName
NodeName
OuterXML
Prefix
First, select the node or nodes are selected and then you use xmlElementComponent to get the element information. Follow these steps.
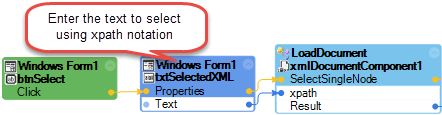
Return to the LoadDocument automation, add the xmlDocumentComponent SelectSingleNode method and connect the design blocks as follows.
Right-click the Result of the xmlDocumentComponent and select Extract Proxy. An xmlElementComponentProxy1 is added to the automation in the Local component tray and is displayed on the automation.

The xmlElementComponentProxy1 lets you access properties of the selected node. Add the xmlElementComponentProxy1 HasChildNodes property and the WinForm Checkbox Checked property to the automation and connect the design blocks as shown below.

To display the InnerText of the selected node, use the xmlElementComponentProxy1 InnerText property and connect this to the txtInnerText text box.

To display the InnerXml of the selected node, use the xmlElementComponentProxy1 InnerXML property and connect this to the txtInnerXML text box.

To display the LocalName of the selected node, use the xmlElementComponentProxy1 LocalName property and connect this to the txtLocalName text box.

To display the Name of the selected node, use the xmlElementComponentProxy1 NodeName property and connect this to the txtName text box.

To display the OuterXML of the selected node, use the xmlElementComponentProxy1 OuterXML property and connect this to the txtOuterXml text box.

To display the Prefix of the selected node, use the xmlElementComponentProxy1 Prefix property and connect this to the txtPrefix text box.

Save and run the solution. Enter the full path and file name of the XML document to load and click the Load button. Next, enter the XPath for the Book node: //book and click Select. Information for the first book node is retrieved. The resulting Windows form is shown here.

The next part of the automation uses the methods for the xmlElementComponent to retrieve information about the following nodes related to the selected node.
FirstChild
LastChild
Follow these steps.
Add the GetFirstChild method for the xmlElementComponentProxy1 to the automation. Right-click the element data output node and select the Extract Proxy option. The xmlElementComponentProxy2 is added to the Local tray and automation. This proxy contains the FirstChild node. Begin this part of the automation as follows.

By connecting the True Result event node to the Proxy, only non-null First Child elements are used.Use the xmlElementComponentProxy2 ToString method to get FirstChild node information. Connect the Result of the ToString method to the txtFirstChild text box.

Add the GetLastChild method for the xmlElementComponentProxy1 to the automation. Right-click the element data output node and select the Extract Proxy option. The xmlElementComponentProxy3 is added to the Local tray and automation. This proxy contains the LastChild node. Begin this part of the automation as follows.

Use the xmlElementComponentProxy3 ToString method to get LastChild node information. Connect the Result of the ToString method to the txtLastChild text box.

Save the solution. The completed automation is shown here.

Run the solution. Enter the full path and file name of the XML document to load and click the Load button. Next, enter the XPath for the Book node: //book and click the Select button. Information for the first book node is retrieved. The resulting Windows form follows is shown here:

Part IV: Retrieving a list of child nodes
The last part of the automation uses a ListLoop component to process all of the child nodes under the selected node (xmlElementComponentProxy1) and display them in the list box.
Add a ListLoop component to the automation. See the ListLoop Component topic for more information on this component.
Add the xmlElementComponentProxy1 HasChildNodes property and ChildNodes property to the automation. Also add the Listbox Items property and Listbox.Items Clear method (access this method from the Explore Component Properties pane).
Prepare the Listbox and start the ListLoop by connecting the design blocks as follows:

To process the individual Child Nodes, you need to create a proxy from the Item output data node of the ListLoop. Right-click the Item output and select Extract Proxy. Connect the ItemYielded output event to the xmlElementComponentProxy4 input event as shown below.

Use the ToString method for the xmlElementComponentProxy4 to get the text for the node and add this text to the Listbox using the Listbox.Items Add method (access this method from the Explore Component Properties pane). Connect the design blocks as shown below.

Save the solution. The complete automation for this solution is shown here.

Run the solution. Enter the full path and file name of the XML document to load and click the Load button. Next, enter the XPath for the Book node: //book and click the Select button. Information for the first book node is retrieved. The resulting Windows form is shown here.

Related information
Using the xmlDocumentComponent with Schema
